Getting started
The following is a guide to illustrate the basic uses of this package. This is meant as a walkthrough with import statements and dependencies used in the beginning used throughout for concise code. Please begin from the top. Here is a simple example of how to predict a single image.
from deepforest import main
from deepforest import get_data
import os
import matplotlib.pyplot as plt
model = main.deepforest()
model.use_release()
img=model.predict_image(path="/Users/benweinstein/Documents/NeonTreeEvaluation/evaluation/RGB/TEAK_049_2019.tif",return_plot=True)

#predict_image returns plot in BlueGreenRed (opencv style), but matplotlib likes RedGreenBlue, switch the channel order.
plt.imshow(img[:,:,::-1])
![(../www/getting_started1.png)]
Prebuilt models
DeepForest has a prebuilt model trained on data from 24 sites from the National Ecological Observation Network. The prebuilt model uses a semi-supervised approach in which millions of moderate quality annotations are generated using a LiDAR unsupervised tree detection algorithm, followed by hand-annotations of RGB imagery from select sites.
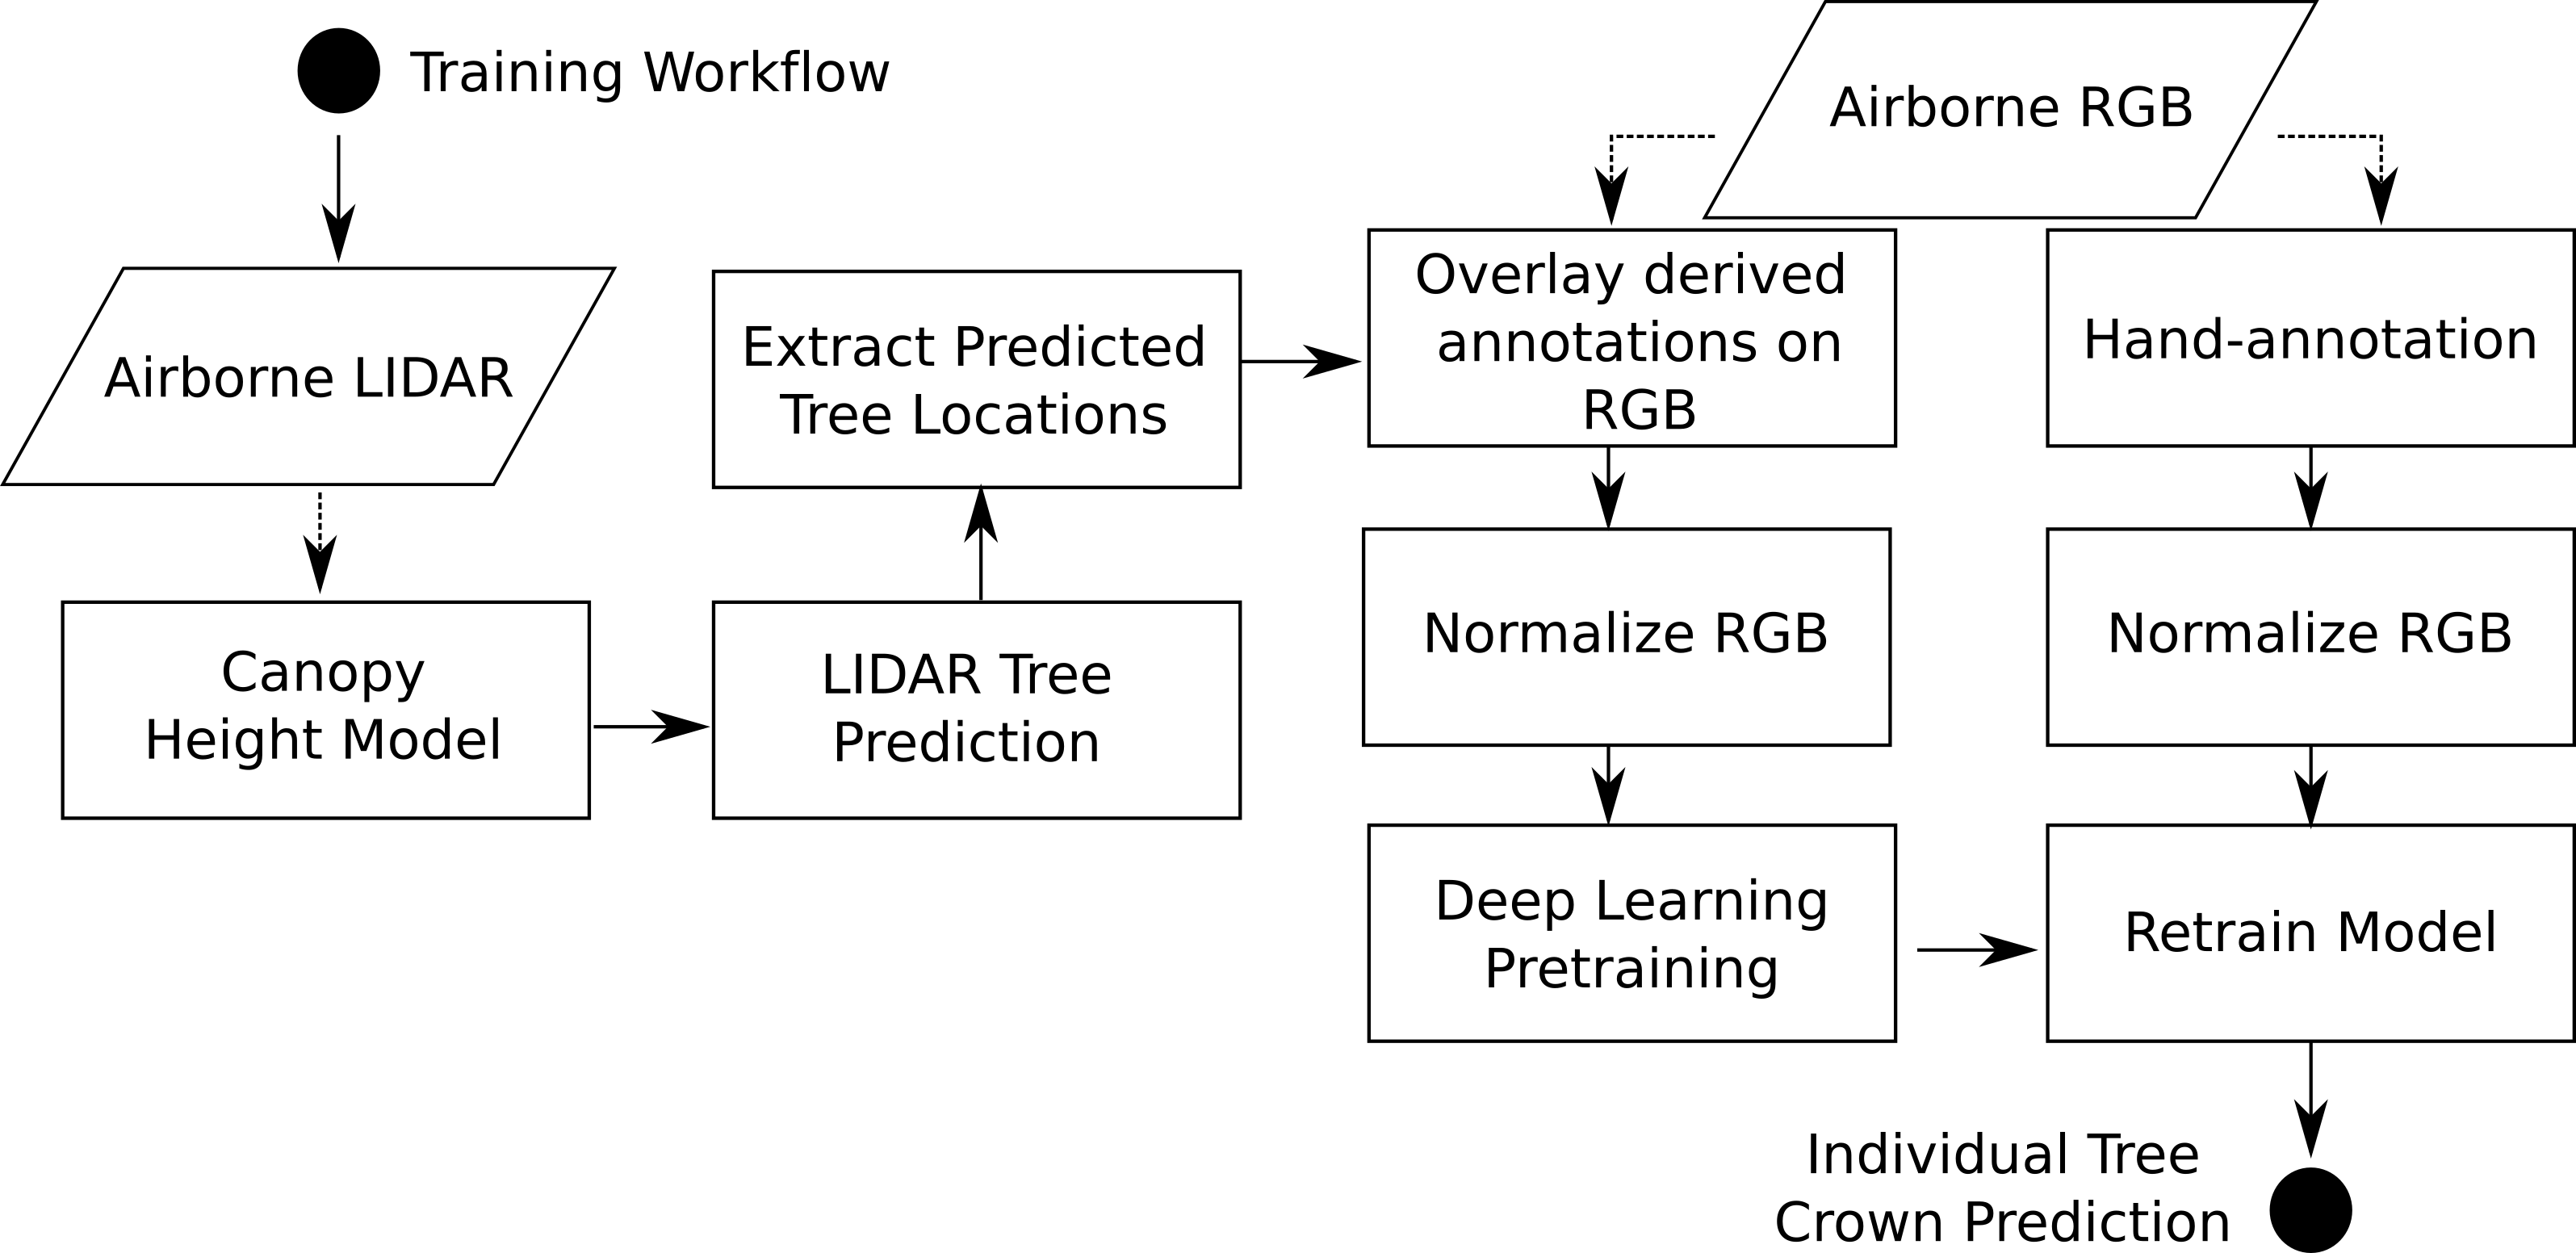 For more details on the modeling approach see citations.
Setting the correct window size to match the prebuilt model takes a few tries. The model was trained on 0.1m data with 400m crops. For data of the same resolution, that window size is appropriate. For coarser data, we have experimentally found that larger windows are actually more useful in providing the model context (e.g 1500px windows). At some point windows become too large and the trees are too tiny to classify. Striking a balance is important.
Sample data
DeepForest comes with a small set of sample data to help run the docs examples. Since users may install in a variety of manners, and it is impossible to know the relative location of the files, the helper function get_data is used. This function looks to where DeepForest is installed, and finds the deepforest/data/ directory.
sample_image = get_data("OSBS_029.jpeg")
sample_image
'/Users/benweinstein/Documents/DeepForest-pytorch/deepforest/data/OSBS_029.jpeg'
Prediction
DeepForest allows convenient prediction of new data based on the prebuilt model or a custom trained model. There are three ways to format data for prediction.
Predict a single image
For single images, predict_image can read an image from memory or file and return predicted tree bounding boxes.
# Predict test image and return boxes
# Find path to test image. While it lives in deepforest/data,
# it is best to use the function if installed as a python module.
# For non-tutorial images, you do not need the get_data function,
# just provide the full path to the data anywhere on your computer.
image_path = get_data("OSBS_029.tif")
boxes = model.predict_image(path=image_path, return_plot = False)
boxes.head()
         xmin        ymin        xmax        ymax  label    scores
0  334.708405  342.333954  375.941376  392.187531      0  0.736650
1  295.990601  371.456604  331.521240  400.000000      0  0.714327
2  216.828201  207.996216  245.123276  240.167023      0  0.691064
3  276.206848  330.758636  303.309631  363.038422      0  0.690987
4  328.604736   45.947182  361.095276   80.635254      0  0.638212
For the release model, there is only one category “Tree”, which is numeric 0 label.
Predict a tile
Large tiles covering wide geographic extents cannot fit into memory during prediction and would yield poor results due to the density of bounding boxes. Often provided as geospatial .tif files, remote sensing data is best suited for the predict_tile function, which splits the tile into overlapping windows, perform prediction on each of the windows, and then reassembles the resulting annotations.
Let’s show an example with a small image. For larger images, patch_size should be increased.
raster_path = get_data("OSBS_029.tif")
# Window size of 300px with an overlap of 25% among windows for this small tile.
predicted_raster = model.predict_tile(raster_path, return_plot = True, patch_size=300,patch_overlap=0.25)
** Please note the predict tile function is sensitive to patch_size, especially when using the prebuilt model on new data**
We encourage users to try out a variety of patch sizes. For 0.1m data, 400-800px per window is appropriate, but it will depend on the density of tree plots. For coarser resolution tiles, >800px patch sizes have been effective, but we welcome feedback from users using a variety of spatial resolutions.
Predict a set of annotations
During evaluation of ground truth data, it is useful to have a way to predict a set of images and combine them into a single data frame. The predict_generator method allows a user to point towards a file of annotations and returns the predictions for all images.
Consider a headerless annotations.csv file in the following format
image_path, xmin, ymin, xmax, ymax, label
with each bounding box on a seperate row. The image path is relative to the local of the annotations file.
We can view predictions by supplying a save dir (“.” = current directory). Predictions in green, annotations in black.
annotations_file = get_data("testfile_deepforest.csv")

model.config["save_dir"] = "."
boxes = model.predict_file(annotations=annotations_file)
For more information on data files, see below.
Training
The prebuilt models will always be improved by adding data from the target area. In our work, we have found that even one hour’s worth of carefully chosen hand-annotation can yield enormous improvements in accuracy and precision. We envision that for the majority of scientific applications atleast some finetuning of the prebuilt model will be worthwhile. When starting from the prebuilt model for training, we have found that 5-10 epochs is sufficient. We have never seen a retraining task that improved after 10-30 epochs, but it is possible if there are very large datasets with very diverse classes.
Consider an annotations.csv file in the following format
testfile_deepforest.csv
image_path, xmin, ymin, xmax, ymax, label
OSBS_029.jpg,256,99,288,140,Tree
OSBS_029.jpg,166,253,225,304,Tree
OSBS_029.jpg,365,2,400,27,Tree
OSBS_029.jpg,312,13,349,47,Tree
OSBS_029.jpg,365,21,400,70,Tree
OSBS_029.jpg,278,1,312,37,Tree
OSBS_029.jpg,364,204,400,246,Tree
OSBS_029.jpg,90,117,121,145,Tree
OSBS_029.jpg,115,109,150,152,Tree
OSBS_029.jpg,161,155,199,191,Tree
and a classes.csv file in the same directory
Tree,0
We tell the config that we want to train on this csv file, and that the images are in the same directory. If images are in a seperate folder, change the root_dir.
# Example run with short training
annotations_file = get_data("testfile_deepforest.csv")

model.config["epochs"] = 1
model.config["save-snapshot"] = False
model.config["steps"] = 1
model.config["train"]["csv_file"] = annotations_file
model.config["train"]["root_dir"] = os.path.dirname(annotations_file)

model.create_trainer()
To begin training, call trainer.fit on the model object directly on itself. While this might look a touch awkward, it is useful for exposing the pytorch lightning functionality.
model.trainer.fit(model)
Evaluation
Independent analysis of whether a model can generalize from training data to new areas is critical for creating a robust workflow. We stress that evaluation data must be different from training data, as neural networks have millions of parameters and can easily memorize thousands of samples. Therefore, while it would be rather easy to tune the model to get extremely high scores on the training data, it would fail when exposed to new images.
To get an evaluation score, specify an annotations file in the same format as the training example above. The model will
csv_file = get_data("OSBS_029.csv")
root_dir = os.path.dirname(csv_file)

results = model.evaluate(csv_file, root_dir, iou_threshold = 0.4, show_plot=True)
The results object is a dictionary with keys, ‘results’,”recall”,”precision”. Results is the intersection-over-union scores for each ground truth object in the csv_file.
results["results"].head()
    prediction_id  truth_id      IoU    image_path  match
39             39         0  0.00000  OSBS_029.tif  False
19             19         1  0.50524  OSBS_029.tif   True
44             44         2  0.42246  OSBS_029.tif   True
67             67         3  0.41404  OSBS_029.tif   True
28             28         4  0.37461  OSBS_029.tif  False
This dataframe contains a numeric id for each predicted crown in each image, the matched ground truth crown in each image. The intersection-over-union score between predicted and ground truth (IoU), and whether that score is greater than the IoU threshold (‘match’).
The recall is the proportion of ground truth which have a true positive match with a prediction based on the intersection-over-union threshold, this threshold is default 0.4 and can be chaned in model.evaluate(iou_threshold=<>)
results["box_recall"]
0.738
The regression box precision is the proportion of predicted boxes which overlap a ground truth box.
results["box_precision"]
0.428
In a multi-class problem, there
Loading saved models for prediction
DeepForest uses the keras saving workflow, which means users can save the entire model architecture, or just the weights. For more explanation on Keras see here.
Saved Model
import tempfile
import pandas as pd
tmpdir = tempfile.TemporaryDirectory()

model.use_release()

#save the prediction dataframe after training and compare with prediction after reload checkpoint
pred_after_train = model.predict_image(path = img_path)
model.save_model("{}/checkpoint.pl".format(tmpdir))

#reload the checkpoint to model object
after = main.deepforest.load_from_checkpoint("{}/checkpoint.pl".format(tmpdir))
pred_after_reload = after.predict_image(path = img_path)

assert not pred_after_train.empty
assert not pred_after_reload.empty
pd.testing.assert_frame_equal(pred_after_train,pred_after_reload)
Multi-class models
While the primary design of this package is for “Tree” detection with a single class. Multi-class labels are allowed for those looking to extend core functionality. When creating a deepforest model object, pass the designed number of classes and a label dictionary that maps each numeric class to a character label. See FAQ for known challenges of multi-class models on reloading.
m = main.deepforest(num_classes=2,label_dict={"Alive":0,"Dead":1})
Issues
We welcome feedback on both the python package as well as the algorithm performance. Please submit detailed issues to the github repo.